Recipe of the week
 Four Reasons Mini-Desserts are Trending
Felicia Arguello, Kitchen Aid From JeffreyGroup
Mini-desserts are a trend that’s here to stay. Perhaps because it allows us to nibble on different sugary delights without feeling overwhelmed.
KitchenAid shares a few reasons why mini-desserts are the newest trend:
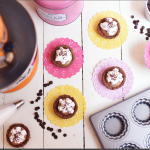
Creating mini-desserts is the new trend – these desserts beautiful make a presentation which is perfect for events or celebrations and allowing oneself to indulge in one or two, without feeling guilty later.
These mini-desserts are cute; their merit is not only in their taste, but also their presentation. Each ingredient adds a layer of texture and color to these desserts. You can even add fruits as toppings to add a burst of color.
· Tiny containers
Serving them is an art. Bringing them to the table, all together in different cups and tiny cones or even little mason jars, is always a delight.
· Try them all
For the curious tasters, these mini-desserts allow guests to try and enjoy different textures and flavors. That’s what makes them a hit at any party. You can find a favorite and learn to make it for your next gathering.


Chocolate Mini-desserts
Recipe courtesy of KitchenAid using the Culinary Center
Anaisa López, KitchenAid’s recipe developer, shares a chocolaty recipe that’s as delicious as her mother’s cooking and part of her memories in the bakery. She has always cooked with KitchenAid’s iconic Culinary Center. “The base turns out perfect – soft but toasted at the same time. The filling… is like a creamy mousse mixed with an ice cream; I can’t even begin to describe it! The texture is dreamy with a delicious flavor and it’s the perfect balance between strong and creamy chocolate.”
Serves: 18-22 mini-desserts
Ingredients –
Base:
· 150 g of all-purpose wheat flour
· 50 g of unsweetened cocoa powder
· 40 g of powdered sugar
· 4 g of salt
· 100 g unsalted butter, cold and cut into little squares
· 1 large egg
· 1 tbsp. of water
Filling:
· 170 g of dark chocolate (I use a 70% bar) in little pieces
· 1 cup (226 g) of unsalted butter at room temperature
· 1 ½ cups (187 g) of icing
· ¼ tsp of salt
· 4 large eggs at room temperature
Meringue:
· 120 g of egg whites (each egg white medium sized weighing around 30 g)
· 240 g of sugar
· Optional: ¼ tsp of cream of tartar (serves to stabilize the egg whites and give them more form)
Preparation –
Preheat the oven to 180 degrees. Prepare the mold you’ll be using. No need to grease the mold.
First, we prepare the base. Keep in mind that the ingredients must be as cold as possible for the dough to have the ideal texture.
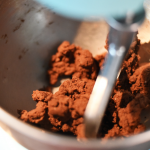
In KitchenAid’s Culinary Center bowl, mix the flour, cocoa, icing, salt and butter (should be cold). Mix at speed 4 until the texture is like sand (as seen on the photo) – no lumps of butter.
Once the mixture reaches the texture indicated above, add the egg and water and continue to mix until the dough is consistent. Make the dough a ball and cover it with plastic wrap, let it sit for 20 minutes in the refrigerator.
Stretch the dough with a rolling pin to approximately 2 mm in diameter. I always place a rectangle of parchment paper over the kitchen counter and place the dough on top. Then, I place another rectangle of parchment paper on top of the dough which keeps the dough from sticking to the rolling pin or the table. Work fast to keep the dough cold.
Allow the dough to cool and leave it stretched in the refrigerator for at least 10 minutes. Cut the dough according to the mold and form carefully using your fingers. The dough can be made into a ball and stretched as many times as necessary but must always remain cool.
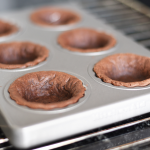
After placing it on the mold, let it cool for approximately 10 minutes. When cool, make little holes with the tip of a knife or a fork at the base of each tartlet and, before baking, cover each one with aluminum foil (or baking paper) to mold the form of the tartlet and, on this foil, add uncooked rice (as shown in the photo). This is done so the tartlets in the oven does not grow and lose its shape.
Bake in a preheated oven for 10 minutes. Then, remove the tartlets carefully to avoid messing up the aluminum foil and rice. Place in the oven for 5 more minutes or until the tartlets are completely cooked. Sometimes the butter might boil a bit and this may be interpreted as being ready, but check them out because they can easily burn. Time is crucial for these mini-desserts.
Let the tartlets cool to room temperature while you prepare their filling.
To make the filling, melt chocolate in the microwave or as a Baño María*. Let cool.
In the culinary center’s bowl, place the butter and sugar and mix on high speed for about 5 minutes until the mixture looks achieves a light yellow color, and looks soft and aerated. The more aerated, the creamier, smoother and fluffier it will be.
Add vanilla, salt and chocolate (must be at room temperature) and whisk until thoroughly mixed.
Begin adding the eggs one by one. Add the first egg, whisk at medium speed and leave on high for at least 5 minutes. Repeat for all 4 eggs.
When the eggs are mixed, add the cream to the baked bases and refrigerate for at least 4 hours to achieve ideal texture.
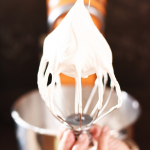
To prepare the meringue, cook the egg whites and sugar in a Baño María* until they reach 50 degrees Celsius (if you don’t have a thermometer – it will be good when the sugar has been completely diluted and there are no lumps). You have to be constantly removing and checking, otherwise the egg whites will cook.
In KitchenAid’s Culinary Center’s bowl (once its clean and dry), pour the egg and sugar mixture and add the cream of tartar if you’re using it. Whisk on medium-high speed with the rods, until shiny, smooth and until the mixture remains on the rods without dripping (as pictured).
Place the meringue in a pastry bag with a decorator tip or use a spatula to place on top of the cooled tartlets. You can place the oven in the au gratin setting for 5 minutes or use a kitchen torch to brown the top of the meringue.
Keep tartlets cold until serving.
* Tip:
To make a Baño María, boil water in a pot or pan. In a smaller pot or pan, empty the egg whites and sugar and place this container on top of the pot with water ensuring that the bottom of the smaller pot does not touch the water, as we want to avoid cooking the egg whites.
IMAGES:
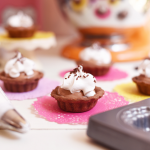
Image 005 Guilt-free delicacies
Imagine making the most attractive mouthwatering desserts
END
JeffreyGroup | Marketing and Corporate Communications
NEW YORK MIAMI MEXICO CITY BRASILIA RIO DE JANEIRO SÃO PAULO BUENOS AIRES