Recipe of the week
 How To Make Peppermint Bark
By Meghan Splawn From The Kitchn
One of our holiday obsessions is a rich and bright peppermint bark, only available in December and eaten in small pieces over hot chocolate while wrapping presents or trimming the tree. If you’ve only enjoyed this stunning treat from a fancy gifted tin from a well-known cooking supply store, then you might be delighted to know how easy it is to make at home.
The ingredient list is short — just dark and white chocolate, peppermint candies, and peppermint oil — and you don’t need any special equipment to make peppermint bark for yourself or to give as gifts. It helps to know a little bit about each ingredient and to have an hour to dedicate to the process. Here’s how to make your own peppermint bark at home for gift-giving this season.
How to Temper Dark and White Chocolate for Bark
The most important step in making bark of any kind is tempering the chocolate. Chocolate bars are hard at room temperature, thanks to tempering, which results in the alignment of cocoa solid crystals. Simply melting chocolate and adding flavoring doesn’t guarantee that the bark will be solid at room temperature. Here are the basics for tempering.
Use high-quality chocolate in the 60 to 70 percent cocoa range.
Finely chop the chocolate; this helps it melt quickly and evenly.
Create a double boiler for melting by using a bowl that sits comfortably over a medium saucepan without touching the bottom. Fill the pan halfway with water.
Leave a portion of the chopped chocolate unmelted; this is known as the seed chocolate.
Test the chocolate’s temper by dipping a small spoon into the chocolate and testing the temperature against your lip. It should “sting,” but not burn. A digital thermometer should read 110°F for temper temperature. You can also stash the spoon in the fridge for a few minutes to make sure the chocolate sets.
You might be tempted to stash the dark chocolate layer in the refrigerator while you temper the white chocolate. Resist! You want the bottom layer to be set but not completely hard when you add the top layer. This way the warm white chocolate can slightly melt the dark chocolate and stick together; otherwise the two layers may split apart when you chop the bark.
Peppermint Oil vs. Peppermint Extract
Be sure to use oil-based flavoring, not extract. Extracts often contain water and will cause the chocolate to seize. You can pick up flavoring oils made specifically for chocolate and candy-making at local craft stores, cake-decorating shops, and online. It’s important to add the flavoring when the oil and the chocolate are relatively close in temperature. If you add the flavoring oil to hot chocolate, it may seize. Peppermint oil is added to both chocolate layers for a double hit of flavor. The dark chocolate has a hint of peppermint flavor, but it really comes through in the white chocolate. The peppermint makes the white chocolate taste more refreshing and not as cloyingly sweet.
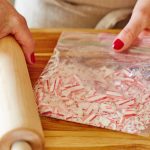
Tip: Use the starlight peppermints or crush a few candy canes for the topping. Freezer bags are thicker than their storage counterparts and thus less likely to tear when you crush the peppermints.
Gifting the Peppermint Bark
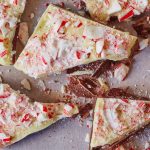
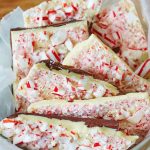
Once the bark is set, you can break it into four to six large pieces — perfect for wrapping in parchment and gifting. You can easily double this recipe for more gifts, or give an entire batch in a decorative tin. The peppermint bark can be stored in an airtight container at room temperature for about 10 days, after which the peppermint candies will start to soften.
Crush the candies: Place the peppermint candies in a quart zip-top freezer bag, remove as much air as possible, and seal. Pound the candies with a rolling pin or meat mallet into small to medium-sized pieces; set aside.
Crush the candies: Place the peppermint candies in a quart zip-top freezer bag, remove as much air as possible, and seal. Pound the candies with a rolling pin or meat mallet into small to medium-sized pieces; set aside.
Line pan: Line an 8 by 8-inch baking dish with parchment paper, making sure the paper hangs over 2 sides to form a sling; set aside.
Set up for tempering: Have 2 large metal bowls and 2 spatulas ready, making sure they are all clean and very dry. Fill a medium saucepan halfway with water and bring to a simmer. There should be enough water in the saucepan that it cradles the bottom the metal bowls, but does not introduce any water into the bowl. Turn off the heat.
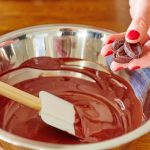
Melt some of the dark chocolate: Place 6 ounces of the dark chocolate into 1 of the metal bowls and set this over the heated water. Do not stir the chocolate; instead, let the heat from the water begin melting the chocolate. Once it’s 2/3 melted, stir gently with a rubber spatula to completely melt the chocolate. Gauge the temperature of the chocolate by touching a small dot of the chocolate just below your lower lip. The chocolate should sting but not burn and register 110°F on a candy thermometer.
Add the seed chocolate: Take the bowl off of the saucepan and set it on a kitchen towel. Stir in the remaining 2 ounces of chocolate until it is completely melted. Continue stirring until the chocolate thickens and attains a matte finish. Be patient, this will take 20 to 30 minutes.
Test for temper: Test chocolate temperature against your lower lip again. The goal is for the chocolate to feel cool against your skin. If it still feels warm, stir in a small amount of additional dark chocolate. If it feels cool, double check by dipping the back of a clean, dry metal spoon into the chocolate. Set the spoon chocolate-side up in the refrigerator for a few minutes. If the chocolate is shiny and snaps off of the spoon, it is in temper.
Flavor the dark chocolate: Once the chocolate is in temper, add 1 to 2 drops of peppermint oil and stir until incorporated.
Pour dark chocolate into pan: Pour the tempered chocolate into the pan and use a mini offset spatula to spread the chocolate into an even layer. Tap the pan gently on the counter to pop any air bubbles. Set aside at room temperature while you temper the white chocolate.
Temper the white chocolate: With a clean and dry bowl and spatula, repeat the tempering steps described above with the white chocolate. Remember to heat the water in the saucepan again before tempering.
Flavor the white chocolate: Once the white chocolate is in temper, add 1 to 2 drops of the peppermint oil and stir until incorporated.
Pour the white chocolate layer over the dark: Pour the white chocolate onto the dark chocolate layer and spread into an even layer. Tap the pan gently on the counter to pop any air bubbles.
Sprinkle on the candies: Immediately sprinkle the peppermint pieces evenly across the top of the white chocolate.
Cool until hardened: Refrigerate until hardened, about 1 hour.
Break: Cut into 4 to 6 pieces with a large chef’s knife, then package into an airtight container, separating the layers with parchment paper.
How To Make Peppermint Bark
Makes 1 pound, about 4 to 6 servings
What You Need
Ingredients
15 hard peppermint candies (2 3/4 ounces)
8 ounces (60 to 70% cacao) good-quality chocolate discs or fèves, divided, plus more as needed
2 to 4 drops food-grade peppermint essential oil
8 ounces good quality-white chocolate discs or fèves, divided, plus more as needed
Equipment
Quart zip-top freezer bag
Rolling pin or meat mallet
Medium saucepan
2 large metal bowls
Kitchen towel
2 rubber spatulas
Scale
Thermometer (optional)
Mini offset spatula
Parchment paper
Knife
Instructions
Crush the candies: Place the peppermint candies in a quart-sized zip-top freezer bag, remove as much air as possible, and seal. Pound the candies with a rolling pin or meat mallet into small- to medium-sized pieces; set aside.
Line pan: Line an 8×8-inch baking dish with parchment paper, making sure the paper hangs over 2 sides to form a sling; set aside.
Set up for tempering: Have 2 large metal bowls and 2 spatulas ready, making sure they are all clean and very dry. Fill a medium saucepan halfway with water and bring to a simmer. There should be enough water in the saucepan that it cradles the bottom the metal bowls, but does not introduce any water into the bowl. Turn off the heat.
Melt some of the dark chocolate: Place 6 ounces of the dark chocolate into 1 of the metal bowls and set this over the heated water. Do not stir the chocolate; instead, let the heat from the water begin to melt the chocolate. Once it’s 2/3 melted, stir gently with a rubber spatula to completely melt the chocolate. Gauge the temperature of the chocolate by touching a small dot of the chocolate just below your lower lip. The chocolate should sting but not burn, and register 110°F on a candy thermometer.
Add the seed chocolate: Take the bowl off of the saucepan and set it on a kitchen towel. Stir in the remaining 2 ounces of chocolate until it is completely melted. Continue stirring until the chocolate thickens and attains a matte finish. Be patient; this will take 20 to 30 minutes.
Test for temper: Test chocolate temperature against your lower lip again. The goal is for the chocolate to feel cool against your skin. If it still feels warm, stir in a small amount of additional dark chocolate. If it feels cool, double check by dipping the back of a clean, dry metal spoon into the chocolate. Set the spoon chocolate-side up in the refrigerator for a few minutes. If the chocolate is shiny and snaps off of the spoon, it is in temper.
Flavor the dark chocolate: Once the chocolate is in temper, add 1 to 2 drops of peppermint oil and stir until incorporated.
Pour dark chocolate into pan: Pour the tempered chocolate into the pan and use a mini offset spatula to spread the chocolate into an even layer. Tap the pan gently on the counter to pop any air bubbles. Set aside at room temperature while you temper the white chocolate.
Temper the white chocolate: With a clean and dry bowl and spatula, repeat the tempering steps described above with the white chocolate. Remember to heat the water in the saucepan again before tempering.
Flavor the white chocolate: Once the white chocolate is in temper, add 1 to 2 drops of the peppermint oil and stir until incorporated.
Pour the white chocolate layer over the dark: Pour the white chocolate onto the dark chocolate layer and spread into an even layer. Tap the pan gently on the counter to pop any air bubbles.
Sprinkle on the candies: Immediately sprinkle the peppermint pieces evenly across the top of the white chocolate.
Cool: Refrigerate until hardened, about 1 hour.
Break: Cut into 4 to 6 pieces with a large chef’s knife, then package into an airtight container, separating the layers with parchment paper.
Recipe Notes
Storage: The peppermint bark can be stored in an airtight container at cool room temperature for up to 10 days, after which the peppermint candies will start to soften.
All Image credits: Lauren Volo
For more on this story go to: http://www.thekitchn.com/how-to-make-peppermint-bark-238325?utm_source=RSS&utm_medium=feed&utm_campaign=Feed%3A+apartmenttherapy%2Fthekitchn+%28TK+Channel%3A+Main%29